GEAR TUTORIAL: MAKING CUSTOM DIVE SLATES
“The smell of these melted plastic tubes is to die for! Bake these once and you’ll never be able to use store-bought dive slates again! Oooh, so good!” Seriously though, the fumes are probably not good for you…

Introduction
Today we are going to melt plastic and make custom dive slates. Don’t burn down your house.
Gear Tutorial:
MAKING CUSTOM DIVE SLATES
by Rory O’Keefe, December 4, 2020
What do you need for this tutorial?
You will need the following items:
1x tube of 4” PVC, the length depends on how many slates you are making
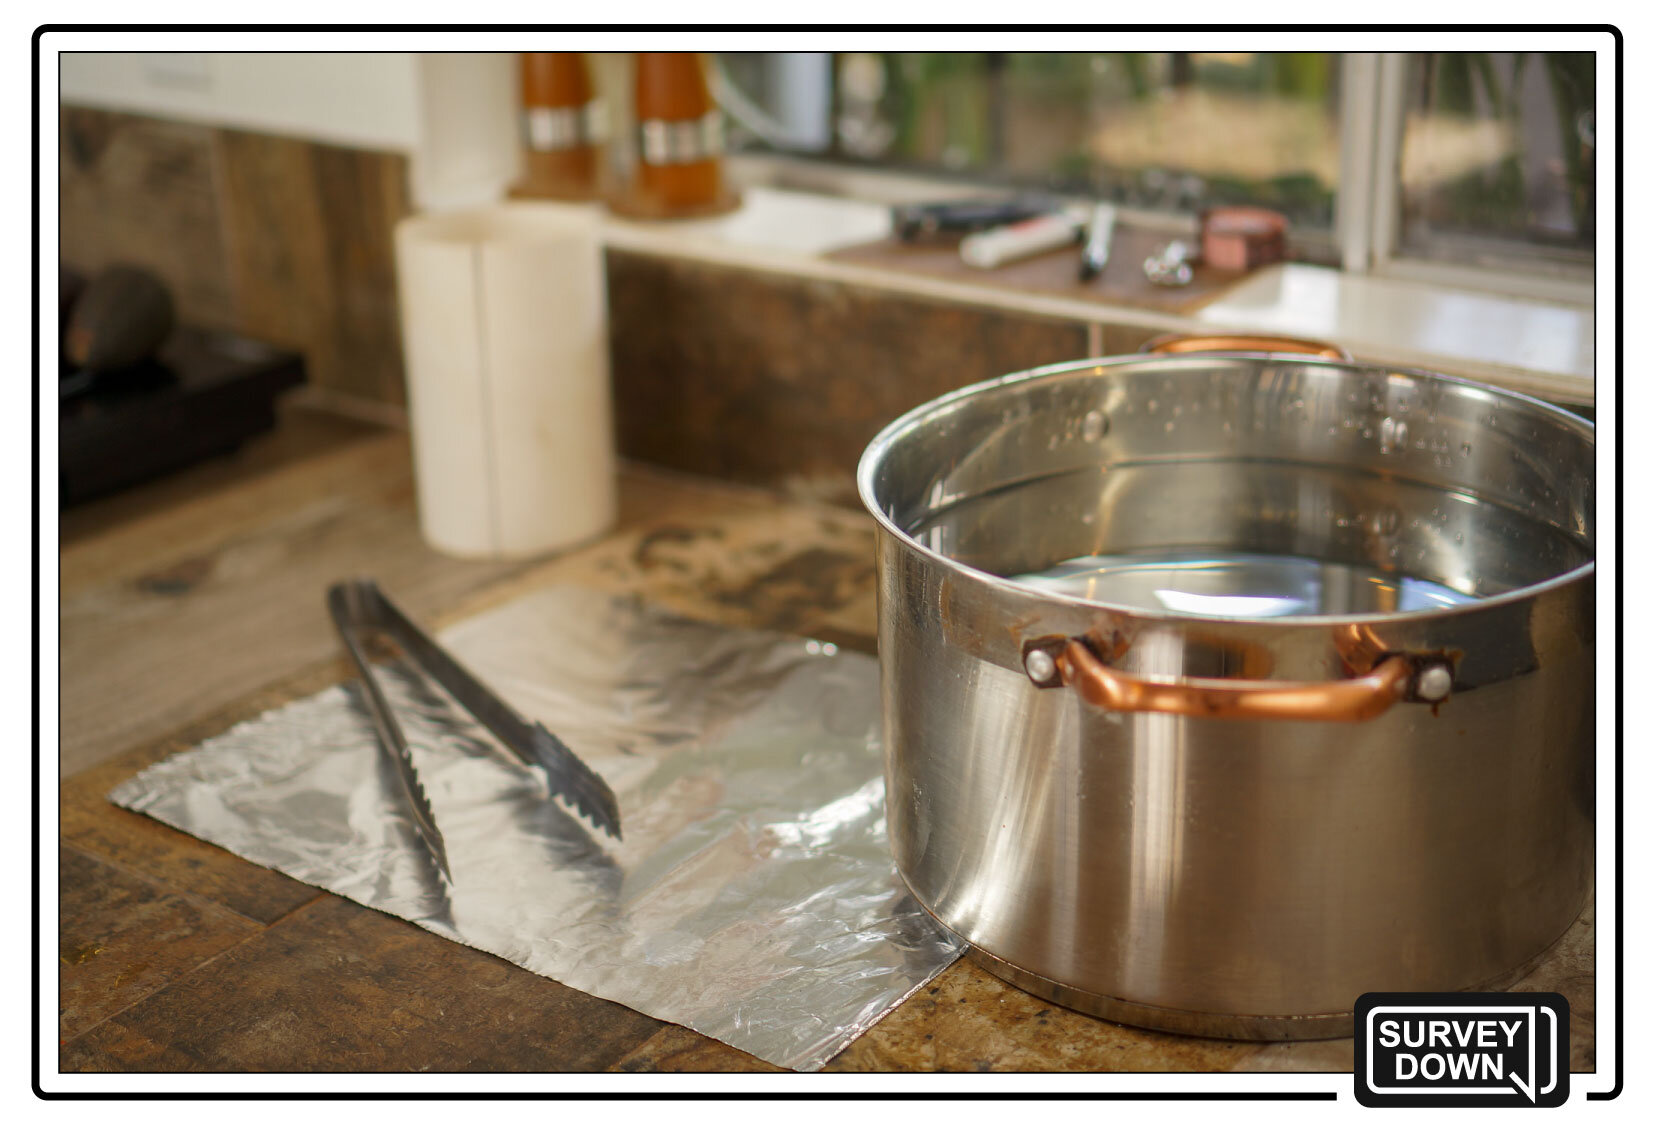
1x heavy / flat thing, I just fill a big pot with water. And hey, It doubles as a fire extinguishing device…
A few sheets of sandpaper, something between 120-220 grit
Some aluminum foil
Hand saw
Ruler or measuring tape & pencil
Oven or toaster oven
Bolt-snap and zip-tie, cave line or bungee (optional)
Knife or scissors & lighter for cutting the zip-tie if you are attaching a bolt-snap (optional)

Making the slate
Step 1: Cut the PVC.
Use your saw to cut the PVC into smaller sections that will fit into your oven, but also a few inches longer than the size of slate you are making.
I am making a smaller sketching slate that will fit into my drysuit pocket. So, my finished slate dimensions will be 5”x8”, but I will cut my PVC tube to be 12” long.
Next, cut down the length of the PVC tube so that it can be flattened.
Tip: If you are not very good at sawing, cut down from one end towards the center, and then start from the other end and finish the cut. This gives you more hand space to hold the PVC while sawing.
These cuts do not need to be perfect. You will make the finishing cuts once the PVC has been flattened.

Step 2: Prepare your workspace.
Prepare your workspace by lining it with aluminum foil and preheat your oven to 300 degrees Fahrenheit.
The hot PVC loses its flexibility quickly so have your heavy, flattening object ready to go.
Note that the PVC will not flatten in one baking cycle so you will have to repeat the following steps 2-3 times.
Step 3: Bake the PVC.
Line the oven rack with aluminum foil and insert the PVC tube with the lengthwise cut facing up.
Bake at 300 degrees Fahrenheit until the sides start to fold down. Note that the goal is to just soften the plastic - don’t melt it.
I used 300 degrees Fahrenheit and baked the tube for about 8 minutes. The temperature and time are not going to be a consistent number here - the PVC is hot enough when the sides start to fold down.

Step 4: Flatten it.
When the PVC has begun to soften, remove it from the oven and quickly place it onto your aluminum foil-lined workspace.
Place your heavy, flat object on top of the PVC and let it cool for 10 minutes. It will not be perfectly flat yet.
If you are making multiple slates, start baking the next length of PVC while the first piece cools. You can then rotate them throughout the baking & cooling cycle.
Repeat the baking & flattening cycle 2-3 times until your PVC tube becomes a PVC sheet.
I always have trouble getting the edges of the PVC to stay flat. To solve this problem, I make a larger PVC sheet than necessary and cut off the curled edges.

Step 5: Cut to size.
Measure and mark lines to cut out your slate from the flattest part of the PVC sheet.
Tip: If you don’t have a square ruler, you can trace a squared edge using a book, and then measure your four sides from those lines.
Cut the slate to its final size.


Step 6: Clean it up.
Use your sandpaper to clean up the rough edges and round over the corners.
Sand the flat sides of your slate so that they are no longer shiny, otherwise, your writing will rub off too easily while diving.

Step 7: Add a bolt-snap.
Drill a hole in your desired clip location and attach it with a loop of cave line, bungee, or a zip-tie.
If you don’t have a drill, use the tip of a utility knife to gently drill a hole into the PVC. You do not need to push hard on the knife to do this - PVC is soft, so you can just lightly rotate the knife tip until you’ve drilled through. It will take 2-3 minutes. Warning: You can easily cut yourself doing this… Please be careful!
If you’re using a zip-tie to fasten your bolt-snap, don’t cut the end off too short. You can melt the tail-end with a lighter so that the zip-tie won’t keep tightening over time.

Step 8: Erasing the slate.
Use a melamine sponge (Mr. Clean Magic Eraser) to erase your slate after use.
Cut one sponge into a number of smaller sponges and it will last for a very long time…
Slate ideas…
I frequently use three types of slates that I’ve made this way: a cave survey slate, a mini wrist slate on my dive computer wrist strap, and a sketching “clipboard” that I use when mapping underwater.

Get creative! A few more ideas where slates can be useful for diving:
Divers who conduct research such as reef surveys will find it useful to create their own slates to be used as clipboards or data entry templates. A permanent marker can be used to create charts on the slates to help organize information that needs to be recorded.
Instructors can use them as teaching aids to speak to their students underwater. Hand signals are always preferable, but you can use slates for creative games such as handing your student a scenario problem that they need to solve underwater.
Wrist slates can be used for jotting down detailed navigation notes, swim times to references, and average depths of multi-level dives for future planning, etc.
Photographers can attach small slates to their housings to help guide their models into position when the model doesn’t seem to understand their hand signals… I have personally read many sternly written notes that say, “STOP SHINING YOUR LIGHT DIRECTLY INTO MY CAMERA.” Sorry, Natalie.
Why don’t I just use wet notes?
Wet notes are great. I have them and they are part of my standard dive gear. For most divers, wet notes are perfectly fine and they will never have a need for making a dive slate.
However, I spend the majority of my time underwater mapping caves. And while I could probably map 40,000 feet of cave in my tiny wet notes, I have zero desire to do so.
So, do I recommend that every diver make a custom slate? No. But if you find yourself doing more than just diving, whether it’s participating in scientific research such as reef surveys, teaching, or photography, you might just find that a slate will make your life a whole lot easier.
Templates
A reader has contributed printable slate plans, including the mini wrist slate shown in the photos above. These drawings can be printed using a laser/toner printer and transferred directly onto PVC using acetone.
Note: A special thanks goes to Matthew Gebert for supplying the plans and transfer photos.
Download the PDFs below and print at a scale of 100%.
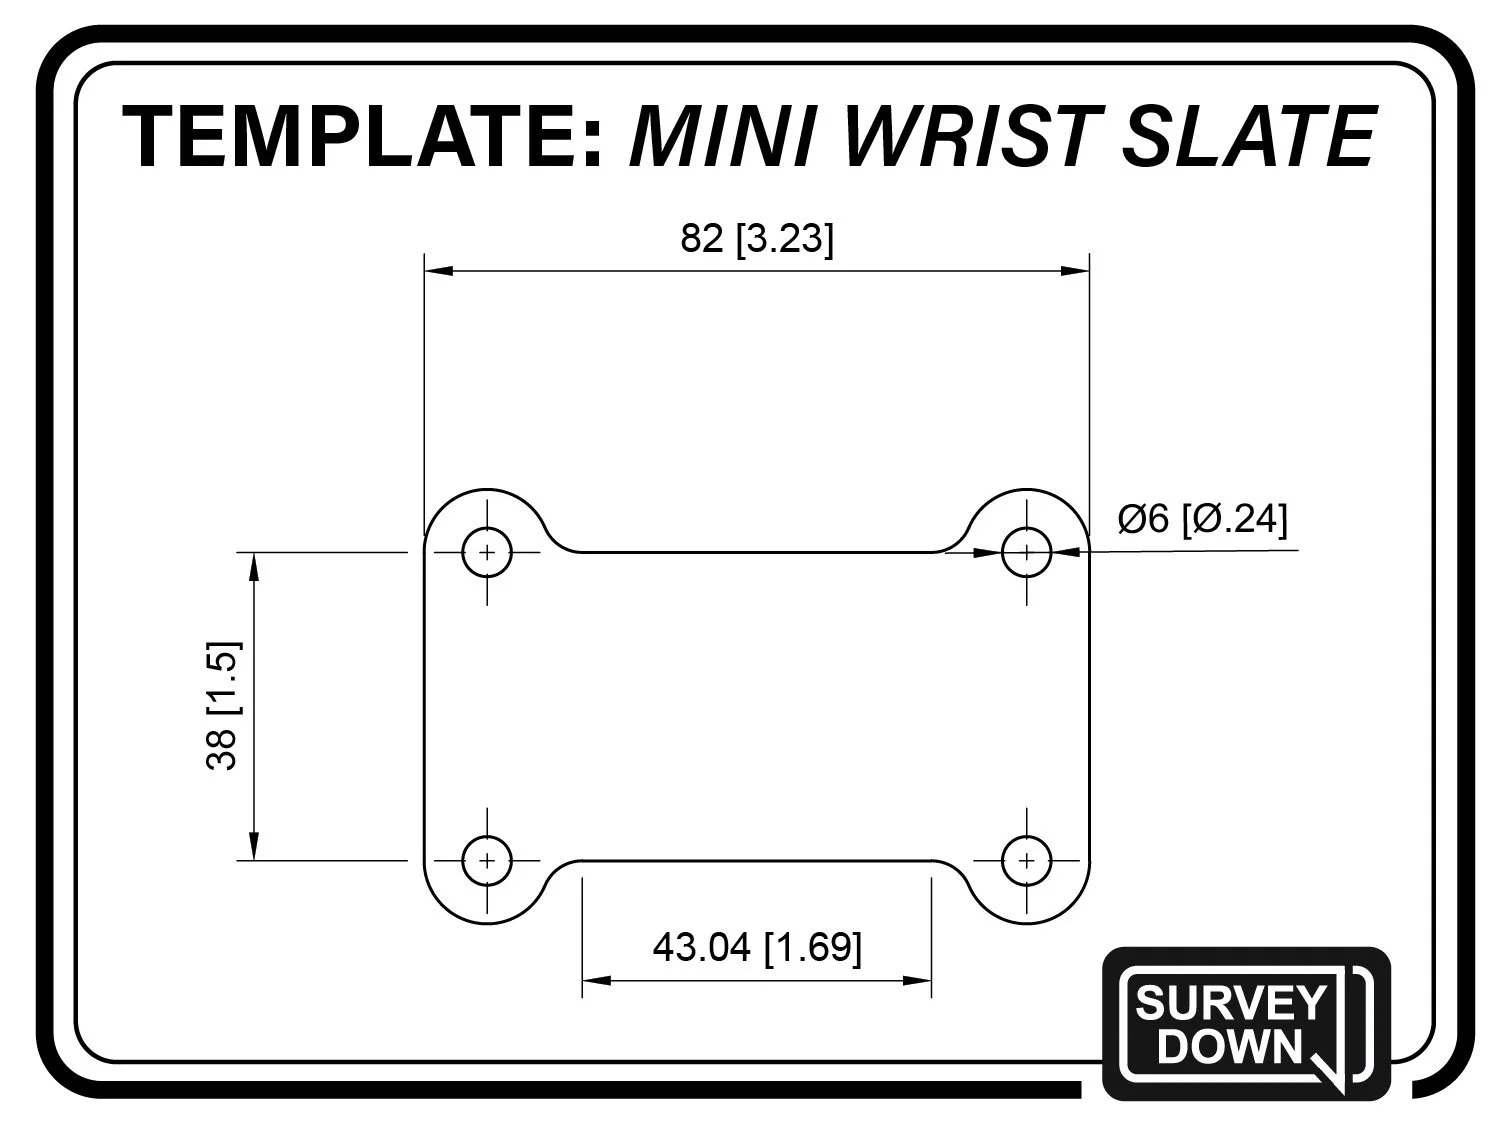
Mini Wrist Slate Template:
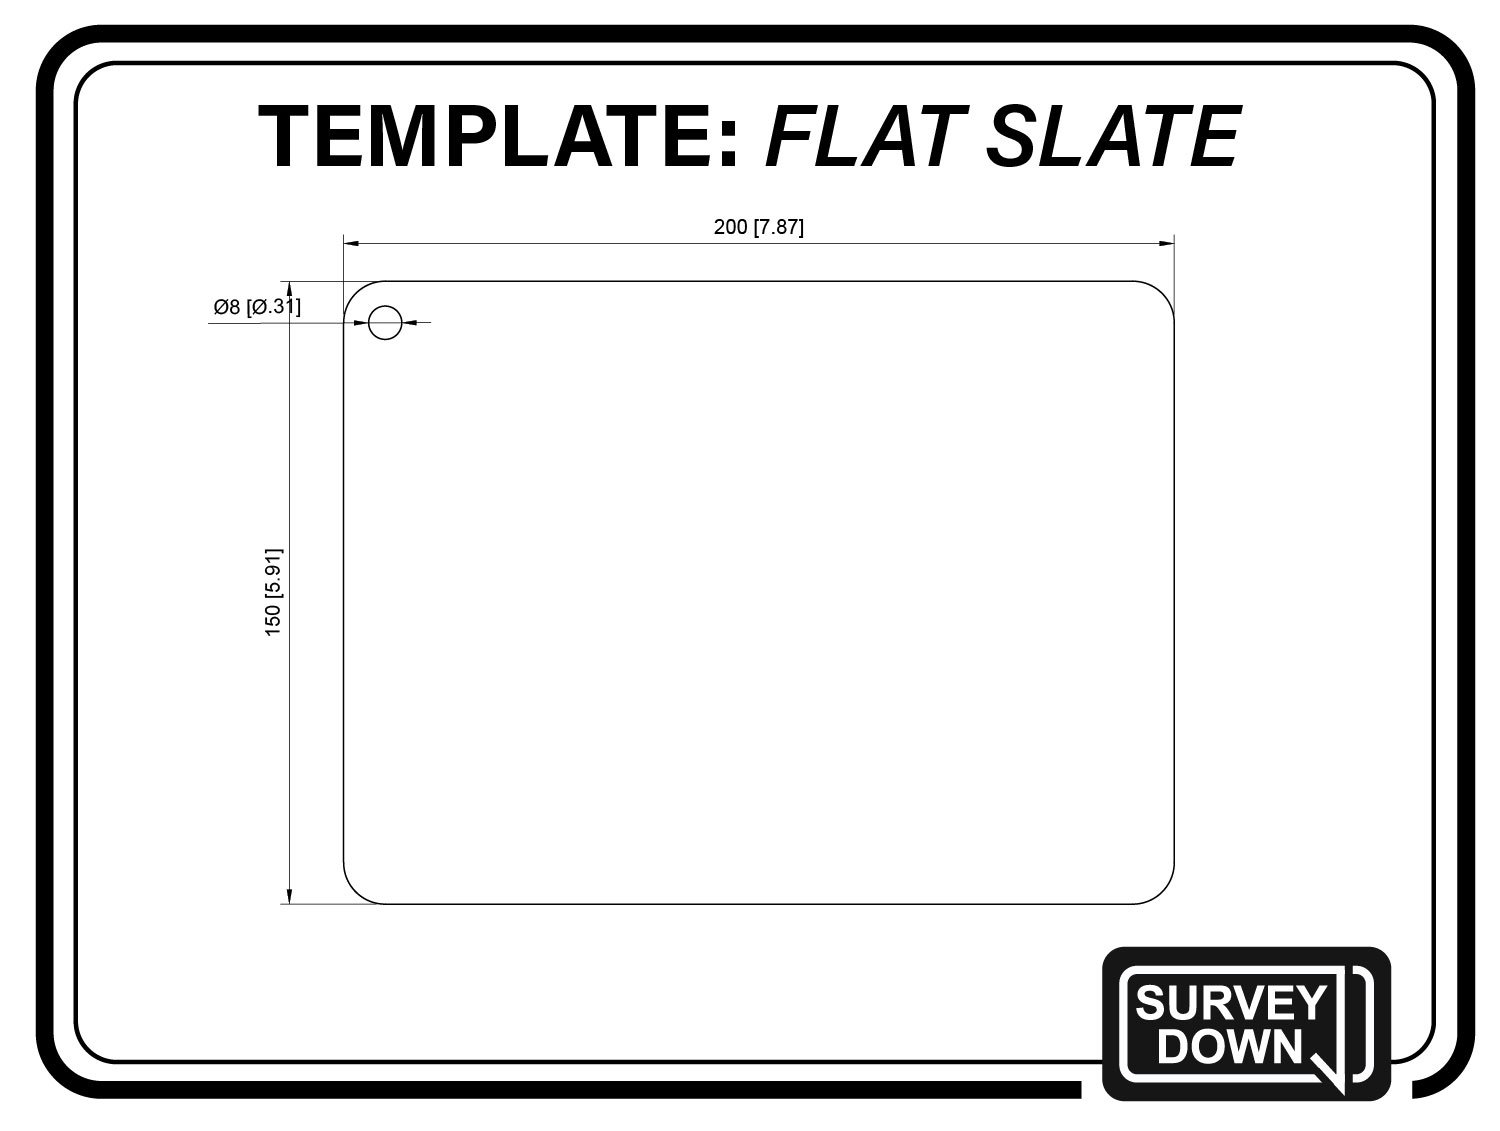
Flat Slate Template:
Acetone Image Transfer
WARNING: Acetone is highly flammable. Flatten the PVC first, then transfer the template.
Step 1: Print the template.
Download and print your chosen template using a laser/toner printer. Be sure to set the print scale to 100%.
Note: An inkjet print will not transfer using acetone!
Cut out the template, leaving space around the edges for tape.
Step 2: Tape the template.
Flip the template so that the printed side is facing the PVC and adhere it with tape.
Be careful to not tape over the actual image as this will prevent the acetone from transferring the ink.
Step 3: Apply acetone.
Working in a well-ventilated area, soak a disposable rag with acetone and rub it into the back of the template to transfer the image.
Wear disposable gloves! And please note that acetone is highly flammable.
Step 4: Clean up.
Remove the template from the PVC and dispose of the acetone-soaked paper, gloves, and rag according to the directions on the can.
The image is ready to be cut out from the PVC.
Credit: Matthew Gebert