USING WALLS: LRUD DIMENSIONS
This is part five of a long-term series that will cover many features of the cave survey application, Walls Project Editor. To start at part one, click here.

Introduction
This tutorial will cover the basic steps to entering LRUD dimensions to underwater dive survey using the cave survey application, Walls Project Editor.
Walls Tutorial:
LRUD DIMENSIONS
by Rory O’Keefe, June 6, 2021
A quick note:
This tutorial will only focus on adding LRUD data. Refer back to Part One: Entering Dive Survey for detailed instructions on entering basic underwater survey data.
What are LRUDs?
LRUDs are the Left, Right, Up, and Down measurements from a survey station to the cave passage walls, floor, and ceiling.
These measurements are considered secondary to the standard guideline survey and add a significant amount of work to the survey process. However, the LRUD data can be easily compiled with the line survey to create a basic cave map.
Section 1: Formatting for LRUDs.
Part 1: Perpendicular or Bisecting Measurements?
Determine whether your measurements are taken perpendicular-from, or bisecting-from each station.
The directive for perpendicular LRUD measurements from each station is LRUD=F.
The directive for bisecting LRUD measurements from each station is LRUD=FB.
Part 2: Update the #Units Directive.
Working in the Survey Text-Editor, add the appropriate LRUD=F or LRUD=FB directive to the end of the regular #Units directive for underwater survey. The complete line should be one of the following:
Meters:
#Units Meters Order=DA Tape=SS LRUD=F
#Units Meters Order=DA Tape=SS LRUD=FB
Feet:
#Units Feet Order=DA Tape=SS LRUD=F
#Units Feet Order=DA Tape=SS LRUD=FB
Note that the #Units directive also specifies the order of the data. So, the LRUD data must now be entered after the depths, and before the comments in the text-editor.

Part 3: Update the Column Titles.
It is important to remember that the following titles are entered as comments, meaning that Walls will not use them as actual titles that define what the numbers mean – they are simply useful for demonstration / organization purposes.
Working in the Survey-Text Editor, enter one of the following column titles, depending on whether your LRUD dimensions are estimated or measured:
;Fr-Stn To-Stn Dist Az Fr-Dpth To-Dpth LRUD (Estimated) Comment
;Fr-Stn To-Stn Dist Az Fr-Dpth To-Dpth LRUD (Measured) Comment
Note: As LRUDs are secondary survey data, they are often estimated, which should be clearly noted!

Section 2: Entering LRUD data.
Part 1: Typing LRUD data.
The LRUD measurements are entered between a set of angled brackets, in the order of Left – Right – Up - Down (<L, R, U, D>).
For example, <2.4, 2.7, 1.5, 0.5>
To indicate a missing measurement, such as a missing wall dimension because of an intersecting passage, two minus symbols are used in place of a number.
For example, <2.4, --, 1.5, 0.5>
Using the survey file for Nohoch Nah Chich, created in Part One of this series, enter the LRUD dimensions as seen in the below image.
Because the LRUD measurements are taken from each station, you will need to add one extra line to the bottom of your survey data to enter the LRUD measurements of the last station.
Recompile the survey file to save and view the new LRUD data.

Section 3: Viewing LRUD Data.
Part 1: Passage Options
Compile your project to open the Review window.
Working in the Map tab of the Review window, check the Passages box to enable the LRUD dimensions to be displayed.
Select the Passages box to open the Passage Display Options window. Here, you can choose to display the passage outlines, LRUD dimension lines, or both, when compiling your project.
Select the option for Both floors and dimension lines, then select OK.
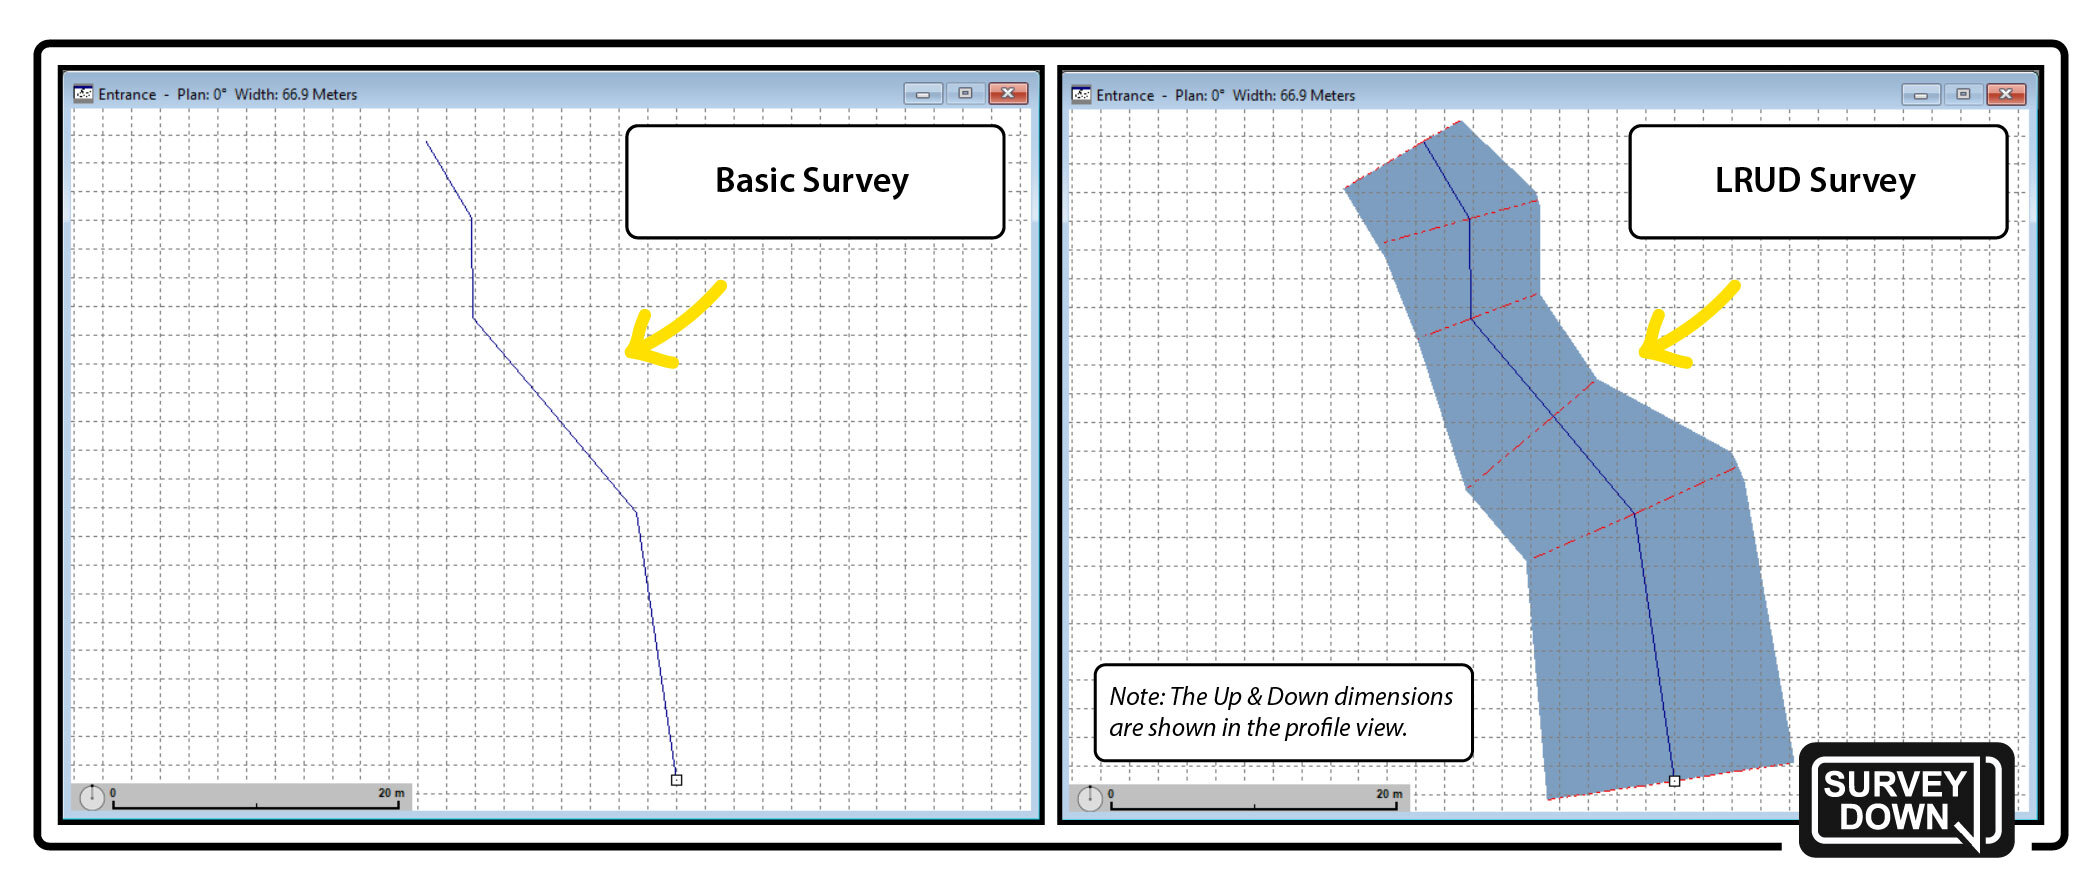
Finally, select Display Map to view the survey with LRUD dimensions.

The End Result
I will admit that the LRUD survey doesn’t look particularly nice, but it is still way better at showing the size of a cave than a basic survey! And besides, recording LRUD measurements (even when estimated) is a great way to add extra data to a project when surveying in a team.
If you’d like to experiment with LRUDs a little more, try changing the colors of the line survey, passage outlines, and dimension lines in the Segments Tab of the Review box.

Note: The LRUD data used for Nohoch Nah Chich in this tutorial is not real data!
Conclusion
Walls admittedly has a learning curve, but it is an excellent tool for managing large amounts of data, archiving, and cave mapping. It is my personal program of choice for working with survey data and I can say through experience that it offers the necessary features to take you straight through to a finished map.
It is also worth noting that Walls includes an extremely thorough user manual with a well-indexed search function.
View the image below for instructions on how to access the Walls manual:
